

1. Lists can be filtered by entering text in the Search field. Not all columns are filterable.
2. Lists can be sorted by some columns.
3. Links to other related lists are common within lists.
4. Lists can be paged, or all records can be viewed.
5. You can move between the pages in the list using the arrows or by clicking directly on a specific page.
For configuration trainings we use the Leaflet library as a map component on the server side. For this reason, we prefer that orienteering maps used for trainings are georeferenced by geographic coordinates. We use satellite maps or the OpenStreet map as the base maps. The map component is used in the definition of stations, their points (flags, zeros and tasks) and parts of the stations themselves. The component is also used to display orienteering maps or solutions for results.
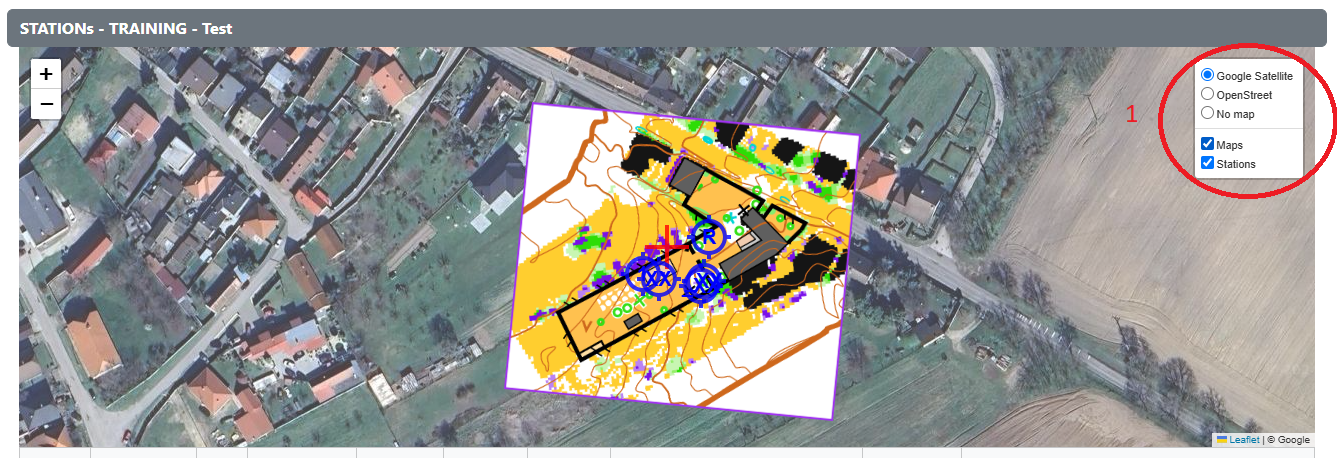
The primary use of the map component is standard as with other common internet maps. The map can be zoomed in or out using the plus and minus buttons. The map can be moved or zoomed in and out with the mouse on classic displays or fingers on touch displays. Some active elements such as stations, points, etc. can be moved by drag and drop. It will be explained in specific parts
1. The layer control lets you toggle the basemap, but also show or hide active elements in the map.
A group is the basic entity under which trainings, maps and competitors are organized. A group can have multiple administrators. Creating groups is currently only allowed by the super administrator role.

1. If you need, you can add any administrator to the group administrator.
2. If you need, you can remove the group administrator.
3. A quick link to view competitors who are assigned to your group.
4. A quick link to view your trainings.
5. A quick link to view your maps.
6. Link to edit basic parameters your group.
7. Removing the selected group, while the condition must be fulfilled that there cannot be any relationships to other objects such as trainings, maps and competitors. The operation must be approved, and if there are related objects, the system will not allow removing.

Basic form for editing basic parameters. Abbreviation is required and must be unique in groups. Name is description.
The competitor is the basic entity for training and recording training results.

1. Creation of a new competitor, where the name, surname, assignment to a group (if the administrator is the administrator of several groups) abbreviation and country (3 chars / olympics style) are entered. For a more precise explanation, see further while editing.
2. Editing attributes for competitors, see next.
3. Removing selected competitor. Philosophy is similar for all removing. First must be removed relation objects as results.
4. Copying competitor to create a similar one faster. The new competitor is identical with the only exception being the prefix _ added to the abbreviation.
5. Mass copying (10, 25, 50). Bulk copying is suitable for training sessions where we do not know the participants in advance and do not want to create them one by one and then reload the data to the phone. The new competitors are identical with the two exceptions being the suffix _?? (?? represent numbers) added to the abbreviation and surname.
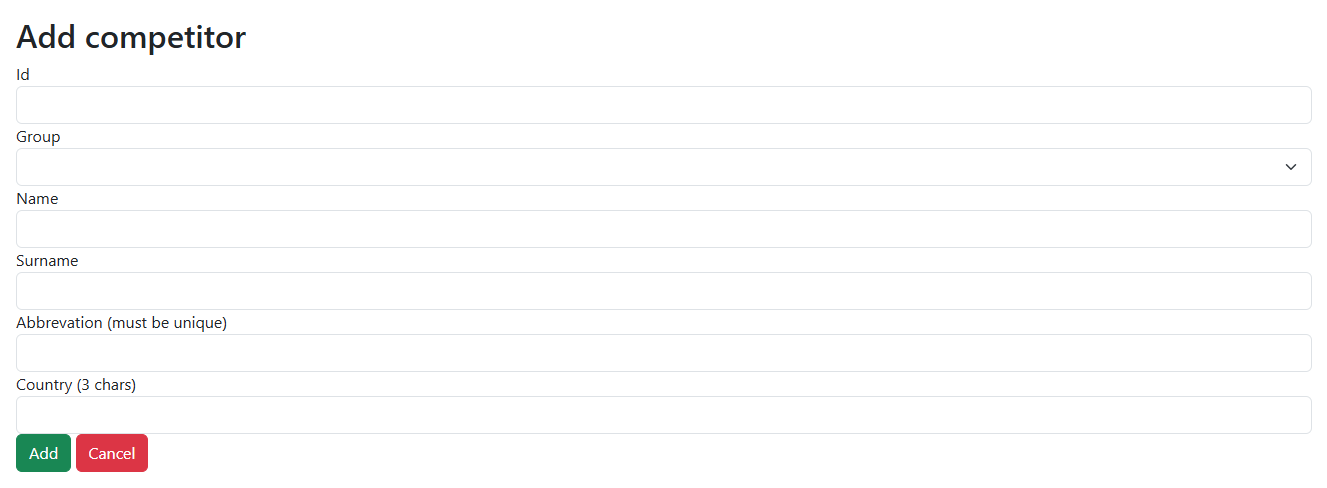
Basic form for adding (editing) basic parameters. All parameters are required and abbreviation must be unique in database. Country use olympics style (3 chars).
Training is the primary entity that combines different types of trail orienteering tasks, whether TempO, TC or PreO type, that will be performed during one training session.

1. Creation of a new training, where the name, description, assignment to a group (if the administrator is the administrator of several groups) and training status are entered, which determines the way of work from the point of view of the application or the results service. For a more precise explanation, see further while editing.
2. Editing attributes for trainings, see next.
3. Removing selected training. Philosophy is similar for all removing. First must be removed relation objects as stations, station parts, maps and results.
4. A quick link to configuration stations for selected training.
5. A quick link to configuration all parts for selected training. This link is a little different as link from stations to station part, because here are all parts from all stations assigned for selected training. It is global view for all tasks in trainings.
6. Link to list maps used for selected training
7. Link to results for selected trainin.

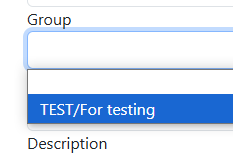
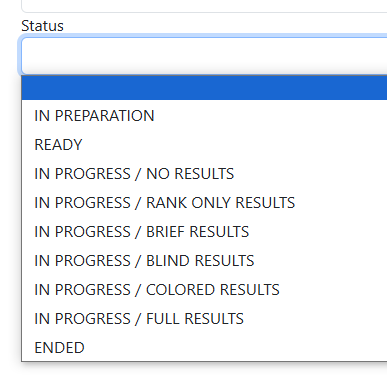
Basic form for adding (editing) basic parameters. Name is required, description is not required. Group and status is required.
Explanation for status attribute: IN PREPARATION is used for preparation phase, trainig with this attribute is invisible on Android app. READY = training is visible in Android app for testing preparation, but not for collecting results. Status started with IN PROGRESS / ... = training is visible and competitors can train. Rest part of status is about results services on WWW. NO RESULTS = results are not show, RANK ONLY RESULTS = only results with rank, no times, no answers, BRIEF RESULTS = results with rank and overall times, BLIND RESULTS = results with rank and detailed times but without results, only gray color for answers, COLORED RESULTS = full results with colored answers, no letters, FULL RESULTS = full results with letters and finally status ENDED is for full results with graphic solutions.
Important information: Status is important for not logged users as competitors or visitors. Logged administrator see complete results as ENDED status.
In progress ...
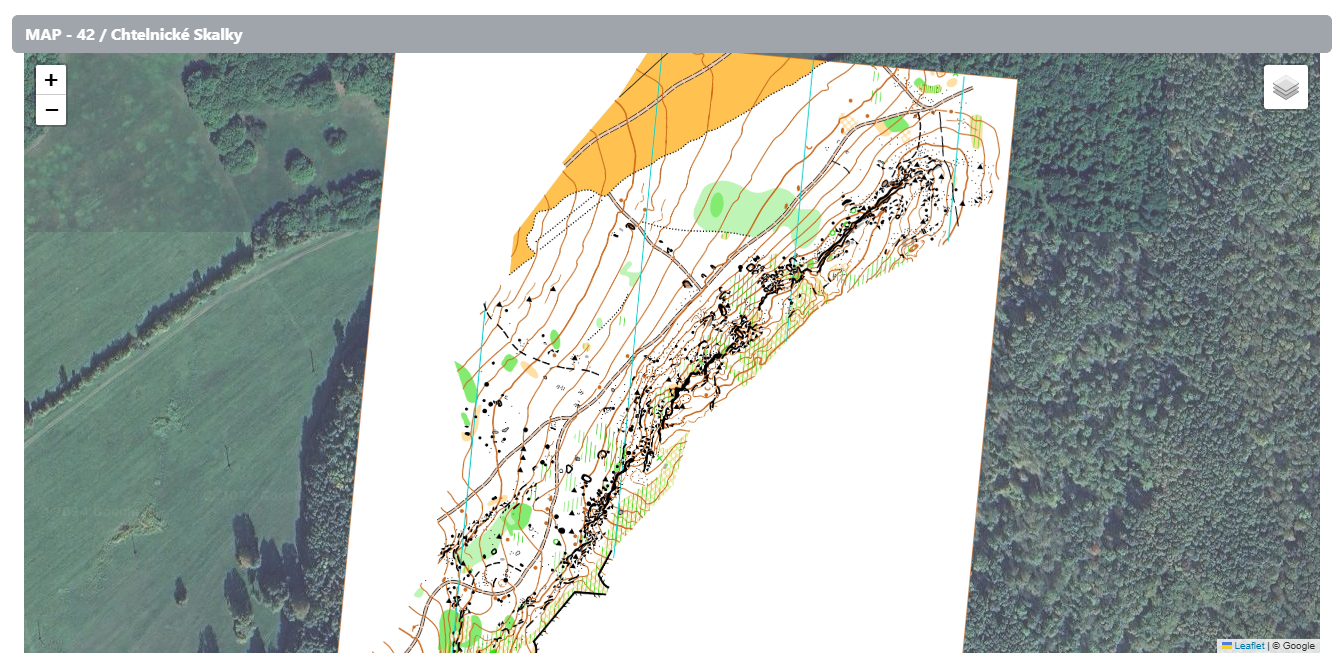
Without an orienteering map, it is impossible to configure and implement training. In our case, a PNG image is used as the map, where the only (now) known limitation is that the width or height of the image cannot exceed 4096 pixels. It is a limitation of the map component in the android application. This limitation can be circumvented by using multiple contiguous maps in one training session, so it is not a critical issue. In terms of server limitations, the one image must not exceed 32MB in size, which is the limitation of the hosting I use.
Map preparation:
In order to work well with the map, e.g. correctly identifying the north, we use georeferenced maps.
The easiest way to create an image from a map and get geographic coordinates? There are several options and I will describe one of them. Of course, if someone has a description for another option(s), I will be happy to add it to the documentation.
Using the Ocad software (link):
1. open the map in .ocd format
2. georeferencing the map, if it is not georeferenced, otherwise continue with step 3.
2.1 set the coordinate system using the function Map ► Set Scale and Coordinate System ...
2.2 locate the map using the function Background Map ► Online Map Services...
2.3 I recently discovered a nice function in Ocad, File New Map Wizard ..., which allows you to very easily create a new georeferenced map for further use.
3. creating an rectangle that represents the extent of the resulting image (for me it's the easiest way to do it, and it's practical if you edit the map for some reason and want to make the image the same size, so you don't have to enter new coordinates)
4. export to a PNG file using the File ► Export ... ► PNG function, selecting a prepared rectangle as input.
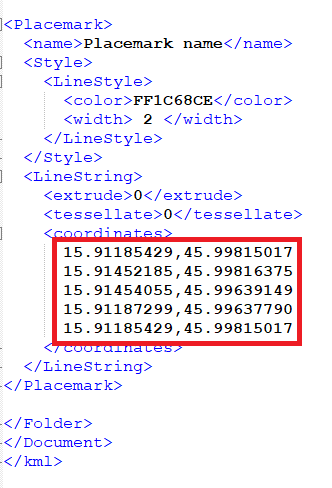
5. Export to a KML file using the File ► Export ... ► KML Google Earth (Vector) function, while the prepared rectangle is selected as input. After opening the resulting KML file, the part with the coordinates of the rectangle is interesting for us.
Using the OpenOrienteering Mapper (OOM) software (link):
I am an absolute beginner in OOM, so please understanding with me. I don not know much about georeferencing in OOM. But here is a very simple guide to easily export a png file and a kml where the gps coordinates are located.
1. open the map
2. georeferencing the map, if it is not georeferenced, otherwise continue with step 3. This procedure was sent to me by Jasminka (thank you), who works with OOM.
2.1 Select Map -> Georeferencing
2.2 Under Map Coodrinate Reference System for Coordinate reference system select UTM
2.3 For UTM zone select appropriate zone (in my case N33)
2.4 Under Reference point, from Google maps (or alternative applicable to you) select point (like crossroad) on the OCAD map and enter those coordinates under Geographic coordinates
2.5 Click on button Pick On Map and click on selected point in map (above mentioned crossroad)
2.6 Click on OpenStreetMap link and check that above selected point is marked on the shown map.
3. creating an rectangle (it is ideal to use a line object that you do not use in the map, because then you can easily identify it in the kml file) that represents the extent of the resulting image (for me it's the easiest way to do it, and it's practical if you edit the map for some reason and want to make the image the same size, so you don't have to enter new coordinates)
4. export to a PNG file using the File ► Export as ... ► Image function, edit the selected area according to the rectangle. After Export ... choose PNG format.
5. Export to a KML file using the File ► Export as ... ► Gepspatial vector data function. Choose (set) file name with .kml extension. After opening the resulting KML file, you must find your rectanngle in file. There is the part with the coordinates of the rectangle which are interesting for us.
Using other software:
...
Work with orienteering maps.

1. Creation of a new record for orienteering map, where assignment to a group (if the administrator is the administrator of several groups), description, google scale and GPS coordinates are entered.
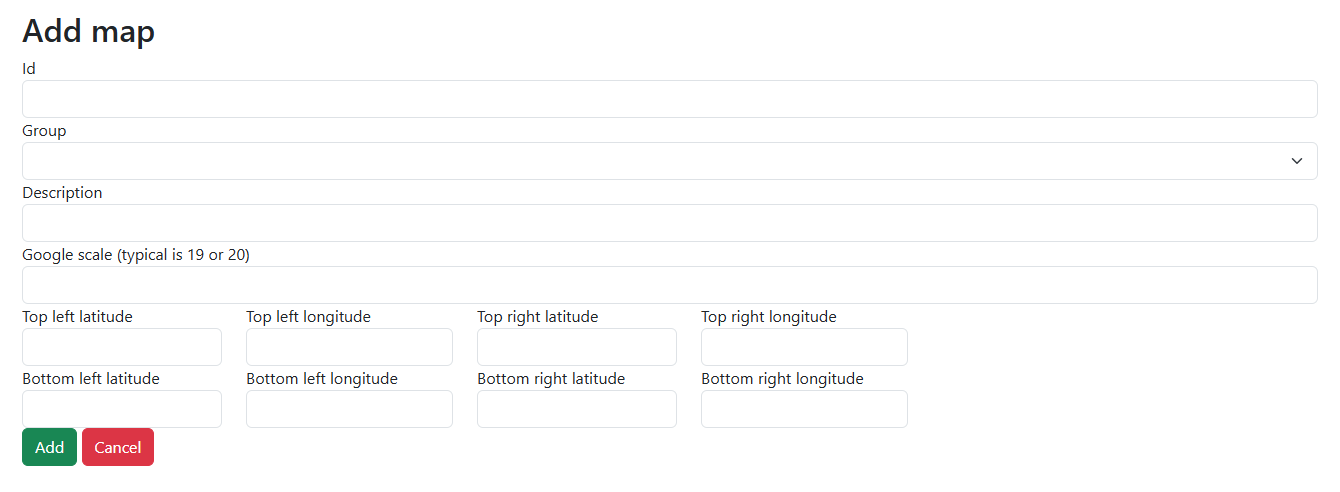

2. Editing attributes for maps.
3. Uploading PNG file with restrictions

4. Deleting PNG file map
5. Removing selected map. Philosophy is similar for all removing. First must be removed relation objects as stations, ... .
6. Viewing map in world map. It is fine for checking georeferencing.
7. Viewing PNG file from map.
8. Locking the map. Locking is useful if the map is ready. To avoid accidental deletion or modification.
9. Unlocking the map.
10. Copying the map. Copying is useful for using in different stations or training with different scale or if you plan used same positions but different content (for example only contours map).
In progress ...
In progress ...
In progress ...
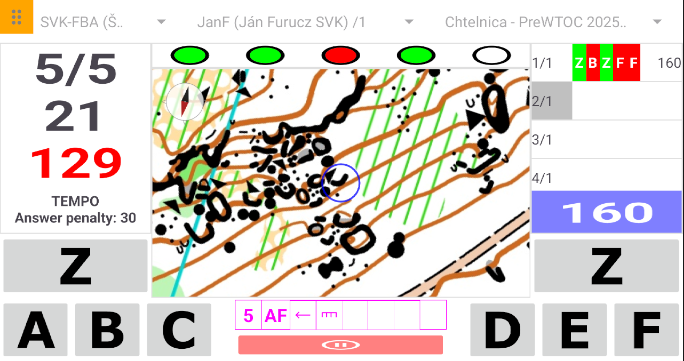
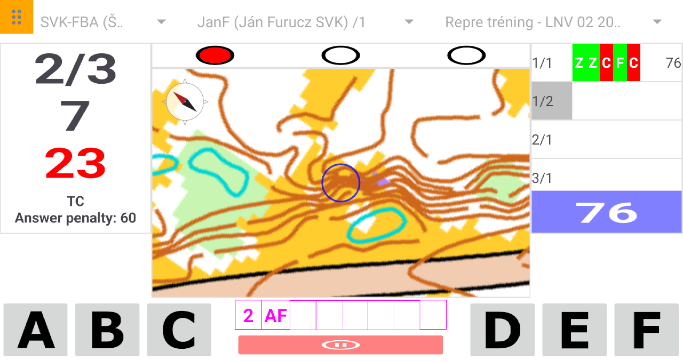
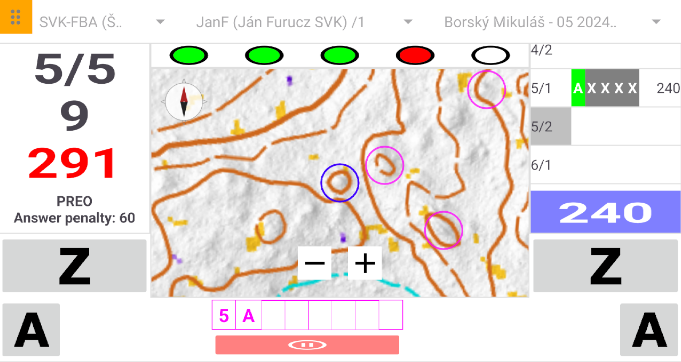
Examples from from application.
Installation:
1. Download latest version of application apk from APPs page.
2. Before installation you must agree with instalation from foreign sources. Current version application is not published from official Google store now. In future I plan add application to Google store.
3. Installation and first start. The following image shows the application after installation.
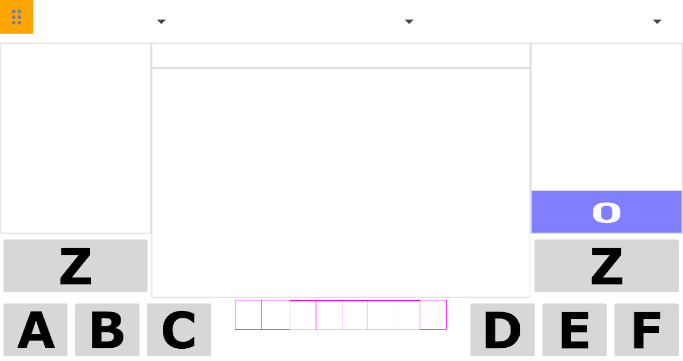
Schema of the app's home screen:
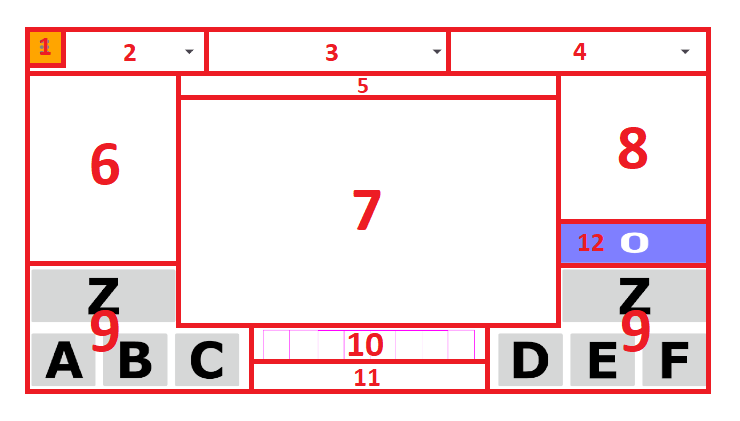
1. Application menu for loading groups, competitors, trainigs, data and maps for trainings. Clearing all data from application and ending application.
Note. the menu icon also serves as an indicator of communication with the server. This is indicated by the animation (rotation) of the orange icon.  Each task is also finished with a message about completion with or without an error.
2. Current group selection
3. Selection of the current competitor
4. Selection of the current training
5. Area for the so-called biathlon targets, where the correctness or incorrectness of the answer is shown, either during training or when examining solutions.
6. Area for displaying basic training information. Number of tasks, current task, ongoing and remaining time until the end of the limit. Station type and penalty information.
7. Area for an orienteering map. Just before the start of the training station, the lines (directions) for flags in the terrain are displayed, then after the start, a map with a circle(s) for the current task. After the training, the area contains information about the solutions (the location of all flags, zeros and tasks). The map can be enlarged, reduced or rotated.
8. List of parts of stations. After completing a part of the station, the results (answers and final time) will appear there.
9. Buttons for recording answers. For TempO A to F and Z. For TC A to Z and for PreO only A and Z. We recommend holding the device with both hands and operating the buttons with your thumbs.
10. Descriptions for tasks.
11. Buttons for start and canceling training on part of station.
12. Overall result after all absolved parts of stations.
Using menu:
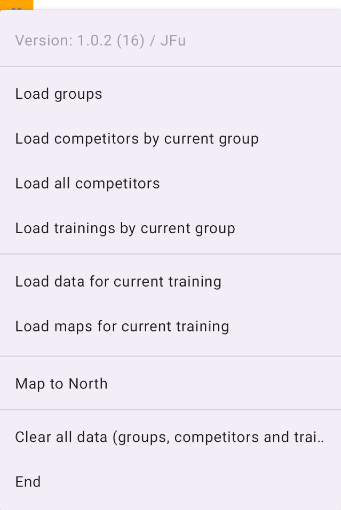
Load groups:
(Internet is required)
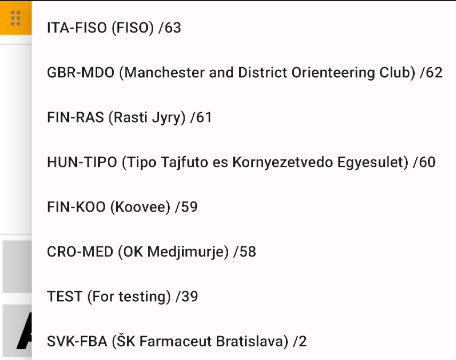
The function is used to upload all groups from the server, which are used to divide training sessions. The function fulfills the so-called spinner (selection button) 2 from the basic schema. It should be noted that uploading groups will cause a complete clear of the application's database, which means the deletion of groups, competitors, trainings, trainings data and results. We should only use this function once at the beginning to get the list of groups.
Load competitors by current group:
(Internet is required)
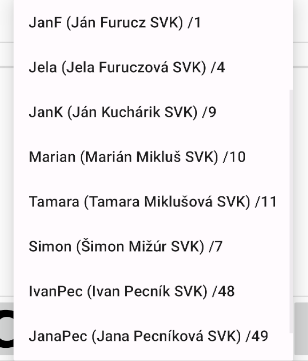
The function is used to upload those competitors from the server according to the selected group. If no group is selected, the application displays an info. The function fulfills the so-called spinner (selection button) 3 from the basic schema. It should be noted that uploading competitors will cause a complete clear part of the application's database, which means the deletion of competitors, trainings, trainings data and results. We should use this function when we have added racers on the server and need to use them in training.
Load all competitors:
(Internet is required)
The only difference compared to the previous function is the uploading of all competitors in the database. Which function to use depends on the group of competitors participating in the training. If you are doing a local training within your group, it is easier to upload only the competitors from the group, if you are organizing a larger training with competitors from several groups, it is easier to record all the competitors. We will see how the experience will be, if it would be problematic, because more competitors equals more complicated selection of the competitor and of course more data in the application, so I would approach the possibility that the competitor could be assigned to several groups.
Load trainings by current group:
(Internet is required)
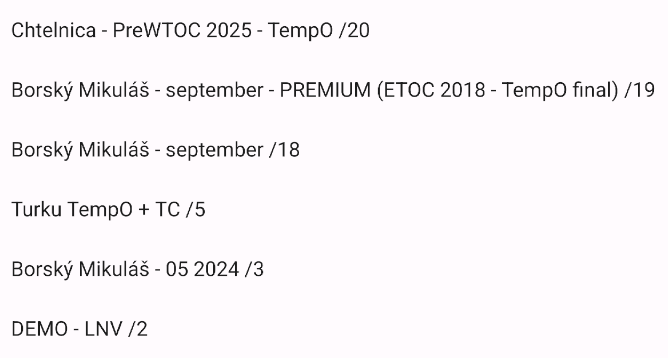
The function is used to upload those trainings from the server according to the selected group. If no group is selected, the application displays an info. The function fulfills the so-called spinner (selection button) 4 from the basic schema. It should be noted that uploading trainings will cause a complete clear part of the application's database, which means the deletion of trainings, trainings data and results.
Load data for current training:
(Internet is required)
The function is used to upload data (configuration of stations, flags, zeros, tasks and answers) from the server according to the selected training. If no training is selected, the application displays an info. It should be noted that uploading data will cause a complete clear part of the application's database, which means the deletion of selected training data and results.
Load maps for current training:
(Internet is required)
The function is used to upload one or more maps from the server according to the selected training. If no training is selected, the application displays an info. It should be noted that uploading data will replace existing map or maps in application.
Map to North
The function can be used in the map section (7), where it causes the map to rotate to the north.
Clear all data (groups, competitors and trainings)
The function will delete all data. It should be noted that clear all data will cause a complete clear of the application's database, which means the deletion of groups, competitors, trainings, trainings data and results.
End
Closing the application.
Realization of training
Prerequisites for starting the training
The following prerequisites must be met for the training to start. Selected group (recorded groups), selected competitor (recorded competitors), selected training (recorded trainings). Recorded data and training maps. If these prerequisites are met, a list will appear in the right part of the list of station parts (8). Clicking on one of the lines activates the corresponding part of the station for training, while the existence of the map is also tested. Areas 5, 6, 7, 8, 9, 10, 12 are activated according to the type of station part. A green button appears in area 11 to start training.
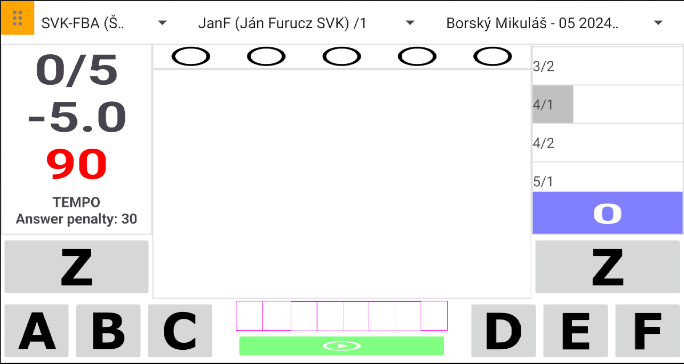
Start
The advantage of the application is that several competitors can start at the same time, if the decision position of station allows a view of all the flags for several competitors, as the competitors do not influence each other when answering. In this way, time can be dramatically saved during training, which is a known problem with the standard procedure.
If the visibility of the flags is good, in theory there is no need to even show the flags because the app uses the georeferenced locations of the flags, so it is possible to show directions to the flags in the app.
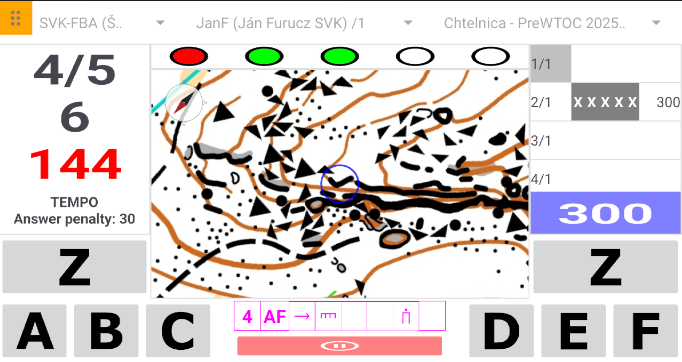
Training is started by pressing the green play button  , when a 5s countdown (standard configuration) begins until the map is displayed in the application. during this time the competitor sees lines pointing towards the flags.
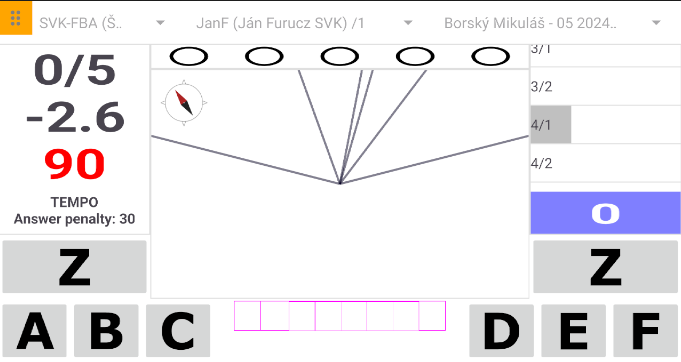
When the countdown ends, the first task from the station will be activated. A map, a circle with a task will be displayed, the number of the current task will change in the left description part, and the descriptions below the map will be filled, if they are set.
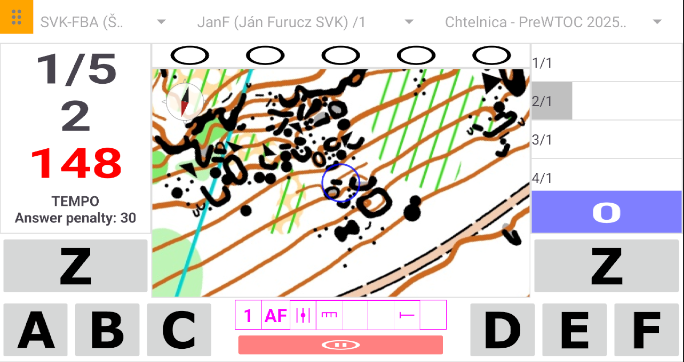
Cancel
At the same time the red pause button  is showed, which can be used to end (cancel) the station.
The repeated process then continues as the competitor solves the tasks by clicking on the corresponding letter for the answer. After each answer, the map, the task, the number of the current task,
descriptions are changed, and at the same time the corresponding biathlon target is recolored to green color  in the case of a correct answer or to red color
 in the case of an incorrect answer. The process is repeated until the competitor solves all the tasks, or until the time to solve the tasks expires,
at which time the unanswered tasks are set to the letter X and grey color, including the corresponding targets.
End
After the end of the training, the application tries to send the results to the server, if the assumption that the training has the "IN PROGRESS ..." parameter is met, otherwise the sending is not performed.
Subsequently, the application is cleared to the state of readiness for the next station, and the results from the station just completed are rewritten in the list of parts of stations and the total result is recalculated according to the completed station.
Solutions
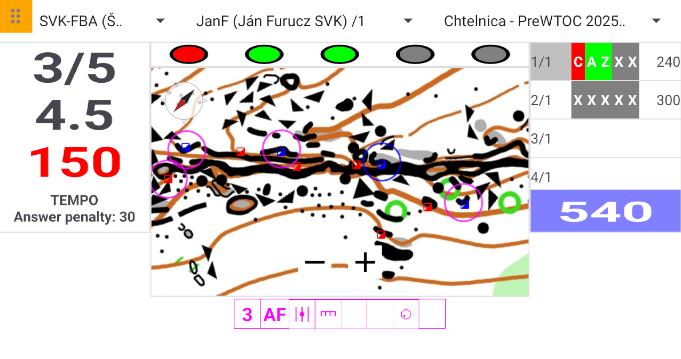
In case there are results in the list of parts of stations, it is possible to activate the so-called solution map, where all tasks, flags and zeros are displayed, while clicking on the corresponding target will center the corresponding task in the center of the map and set the descriptions.
Popup menu in list of part of stations
With the already realized parts of the stations, it is possible to perform additional functions through the so-called pop menu.
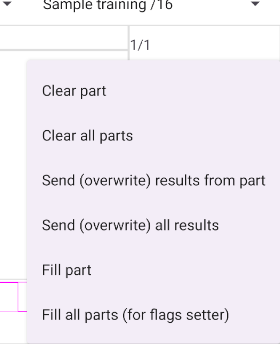
Clear part
The function allows you to clear (reset) an already trained part of the station. For example, due to some error.
Clear all parts
The function allows you to clear (reset) all parts of the station. For example, due to some error.
Send (overwrite) results from part
(Internet is required)
The function is used to send the results from part of station again to the server, e.g. due to non-functioning internet at the station.
Send (overwrite) all results
(Internet is required)
The function is used to send the all results (from currrent training) again to the server, e.g. due to non-functioning internet at the station.
Fill part
The function allows you to fill with X answers part of the station. For example, for quick access to solutions for flags setter.
Fill all parts (for flags setter)
The function allows you to fill with X answers all parts of the stations. For example, for quick access to solutions for flags setter.
1. Creating training
1.1 create a training with the status IN PREPARATION
2. Preparation of map or maps
2.1 create a new or use an existing orienteering map or maps
3.Preparation of training
3.1 Creating stations = position of decision point
3.1.1 Create the 1st station using button  and adjust position
3.1.2 Create additional stations by copying (then there is no need to select a map, the same one will be used) and using red cross for position
3.2 Creating station points = position and description for flags and zeros
3.2.1 Create station points and descriptions. Use second position if position by description is different (e.g. side of stone or edge of pit). You must have at least 6 flags and 0 or more zeros for TempO and TC style of parts. For PreO style you need the same number of flags and 0 or more zeros as you will have tasks.
3.3 Creating station parts = definition of tasks
3.3.1 Create station parts. First choose points for flags (is important choose right flags for Alpha and Foxtrot positions, because these positions will be used for map rotation calculation), then used tasks and finally set right answers (letters). I am preparing a more automated way of selecting tasks, when the answers will be set automatically. It is important to understand that there can be multiple parts at one station. For example, during training, the combination of TempO and TC parts worked well for us. But there have also been competitions in the past where multiple stations were solved from one place. Then it is effective to use copying for the next part, as you will no longer have to set the positions of the flags.
Repeat 3.1, 3.2 and 3.3 to configure multiple stations
4. Checking on mobile
4.1 Change status of training to READY
4.2 Then is possible load data and map for this training to mobile.
4.3 We recommend using the lock functionality for stations, points, and parts to prevent you from accidentally moving or changing tasks.
5. Training
5.1 Change status of training to one from IN PROGRESS / ... depending on what you want the competitors to see in the overall results
5.2 Then is possible load data and map for this training to competitor's mobiles.
5.3 if you have no internet problems, the results are automatically sent to the server after each part. If you have internet problems, after moving to a place where the internet works, you can re-send the results to the server by holding your finger on the relevant part, where a context menu will appear and it is possible to send the results individually for the relevant part or the results from all parts
6. End of training
5.1 Please check if all competitors have sent their results to the server and resolve any problems.
5.2 Change status of training to ENDED. Overall results will change to full results with answers and solutions